Easy Hanzi 2.1 – Chinese character stroke animations and dictionary

December 14th, 2011

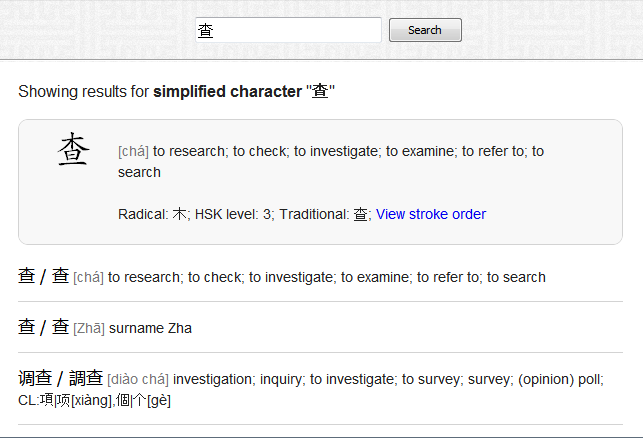
I’ve just released a new version of Easy Hanzi, the Chinese flashcard application. It features among others a new Chinese-English dictionary, flashcard animations and various other minor new features and improvements. It can be downloaded from there:

Download Easy Hanzi, the Chinese flashcard application


Greasemonkey script to remove redirections from Google result pages

December 12th, 2011

This little Greasemonkey script cleans up Google’s result page by replacing the unnecessary redirections by real links. So long links such as http://www.google.com/url?sa=t&rct=j&q=&esrc=s&source=web&cd=1&ved=0CDkQFjAA&url=http%3A%2F%2Fwww.wired.com%2F&ei=DhDmTsjsBa3NmQX_861Y&usg=AFQjCNFHgSSEjuDwVNzzn3fXd7YJysmFGQ&sig2=0t1GLYrrHjniRivye-Jb1Q will be replaced by just http://www.wired.com

Why install this script?

– It allows copying a link directly from Google’s result page (otherwise you need to open the link, then copy it in the browser’s bar).

– In some countries, Google can be very slow so not only you have to wait a long time for the search page to load, but you then have to wait for Google to do its redirection. This script makes Google slightly faster by skipping this unnecessary step.

The script can be downloaded there:

Download Google Links Cleanser script

And the source code is below:

// ==UserScript==

// @name          Google Links Cleanser

// @namespace     http://pogopixels.com

// @description   Convert the redirection links in Google's search results to direct links.

// @include       http://*.google.*
// @include       https://*.google.*

// ==/UserScript==

// parseUri 1.2.2
// (c) Steven Levithan <stevenlevithan.com>
// MIT License
function parseUri(a){var b=parseUri.options,c=b.parser[b.strictMode?"strict":"loose"].exec(a),d={},e=14;while(e--)d[b.key[e]]=c[e]||"";d[b.q.name]={};d[b.key[12]].replace(b.q.parser,function(a,c,e){if(c)d[b.q.name][c]=e});return d}parseUri.options={strictMode:false,key:["source","protocol","authority","userInfo","user","password","host","port","relative","path","directory","file","query","anchor"],q:{name:"queryKey",parser:/(?:^|&)([^&=]*)=?([^&]*)/g},parser:{strict:/^(?:([^:\/?#]+):)?(?:\/\/((?:(([^:@]*)(?::([^:@]*))?)?@)?([^:\/?#]*)(?::(\d*))?))?((((?:[^?#\/]*\/)*)([^?#]*))(?:\?([^#]*))?(?:#(.*))?)/,loose:/^(?:(?![^:@]+:[^:@\/]*@)([^:\/?#.]+):)?(?:\/\/)?((?:(([^:@]*)(?::([^:@]*))?)?@)?([^:\/?#]*)(?::(\d*))?)(((\/(?:[^?#](?![^?#\/]*\.[^?#\/.]+(?:[?#]|$)))*\/?)?([^?#\/]*))(?:\?([^#]*))?(?:#(.*))?)/}}

function isMangledLink(url) {
	var parsed = parseUri(url);
	if (url.indexOf("/url?") < 0) return false;
	if (url.indexOf("&url=") < 0) return false;
	return true;
}

parseUri.options.strictMode = true;

// Get all the anchors
var tags = document.getElementsByTagName('a');

for (i = 0; i < tags.length; i++) {
	var tag = tags[i];
	var href = tag.getAttribute("href");
	
	// Remove the onmousedown events used for tracking
	var onmousedownAttribute = tag.getAttribute("onmousedown");
	if (onmousedownAttribute && onmousedownAttribute.indexOf("return rwt") >= 0) tag.removeAttribute("onmousedown");
	
	if (!isMangledLink(href)) continue;	
	
	// Try to extract the real URL
	var parsed = parseUri(href);	
	var realUrl = "";
	var query = parsed.query.split("&");
	for (var j = 0; j < query.length; j++) {
		var items = query[j].split("=");
		if (items[0] == "url") { // We found the real URL
			realUrl = unescape(items[1]);
			break;
		}
	}
	
	if (realUrl == "") continue; // Skip it if we didn't find the real URL
	
	tag.setAttribute("href", realUrl);
}

Update 2012-02-16:

Script has been updated so that full URLs are not required (thanks to anonymous in the comments).


Integrating WordPress into a Kohana application (or any other framework)

December 9th, 2011

I recently tried to integrate a WordPress blog into a Kohana application, and it turned out to be relatively easy. The method that follows was implemented with Kohana but the same principles can be applied to any other PHP frameworks.

When integrating WordPress, what you really need most of the time is to style the blog so that it fits within your current website. You usually also want the same header and footer as in the rest of the website.

To do so, the idea is to create some API that will allow WordPress to retrieve the header and footer from your application. Then you use the PHP function file_get_contents to import and display this content.

1. Create an API controller in Kohana

First create a new controller in Kohana that will allow getting the header and footer, and output them as HTML. In my case, I simply created an “API” controller:

class Controller_Api extends Controller {
	
	public function action_header() {
		$view = View::factory('header');
		echo $view->render();
	}	
	
	public function action_footer() {
		$view = View::factory('footer');
		echo $view->render();	
	}

}

Once this is done, you can call “http://yourdomain.com/api/header” to get the header or “http://yourdomain.com/api/footer” to get the footer.

2. Install WordPress

Just install WordPress as you would normally do, in any folder at the root of your website (let’s call it “blog” in this example).

3. Create a new WordPress theme

Go to “/blog/wp-content/themes” and copy and paste the default WordPress theme (twentyeleven for 3.x) into a new folder. Rename the folder to the name of your website.

Then go into WordPress’s admin panel and select your new theme.

4. Load your own header and footer

Now you need to modify the footer and header files of the WordPress theme so that they load your own files. Something like that should work:

header.php:

<?php
$url = "http://yourdomain.com/api/header";
echo file_get_contents($url);
?>

<div class="wrapper-box">
	<div id="blog">

footer.php

<div class="clear"></div>
	</div><!-- #blog -->
		</div><!-- #wrapper-box -->

<?php echo file_get_contents("http://yourdomain.com/api/footer"); ?>

“wrapper-box” is the box where you would normally put the main content in your website. “#blog” will be the div containing WordPress’ content.

So just by doing that you should have a working WordPress blog. The main problem however is that by replacing the header you are going to lose WordPress styling. So the next section will explain how to get it back.

5. Bring back WordPress’s styling

In Kohana, modify the header template to load a style file specific for the blog (maybe disable or enable the style depending on the current URL). Don’t directly link to the theme’s style.css but rather create a new empty file (let’s call it “blog.css”). The best way is to start with an empty file and progressively add to it.

Add back WordPress’s style to “blog.css” by copying and pasting from the original theme’s “style.css”. There are some sections of the CSS file that are safe to copy and paste completely – Menu, Content, Images, Images Border, etc. Usually it’s clear from the name that the style is not going to cause any problem. Avoid the section titled “Global” or “Header” as they may change things site-wide and thus break the header, footer or other elements.

If some CSS rules conflict with your current style, just prefix them with #blog. For example, I changed the “a” styling to the following so that it doesn’t change the links in the header and footer:

#blog a {
	color: #1982D1;
	text-decoration: none;
}

#blog a:hover {
	color: #1982D1;
	text-decoration: underline;
}

Your might want to customize the CSS further to either remove some elements or change the margins to make it matches your website.

New Chinese flashcard application – Easy Hanzi

September 18th, 2011

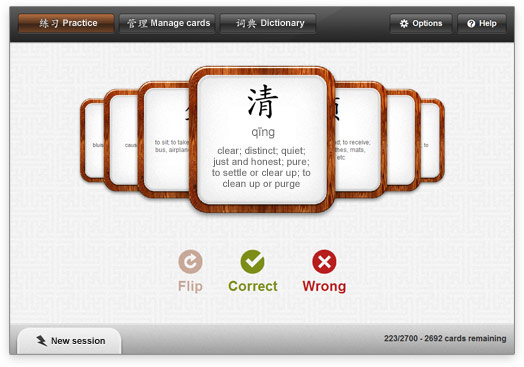
I’ve just released my new Chinese flashcard application – Easy Hanzi. The software has most of the features one might expect from a Chinese flashcard application, including a spaced repetition algorithm, support for both simplified and traditional Chinese characters, and it is shipped with a few lists of most common Chinese characters.

It features an easy-to-use interface to create and manage decks of cards. Finally, during practice sessions, the cards are displayed on a large area to make it easier to identify the various character strokes.

It is available at the following URL:

Easy Hanzi, the Chinese flashcard application.

Screenshot of Easy Hanzi, the flashcard application


How to create a custom model for a QListView in Qt 4

August 2nd, 2011

Qt 4 provides a powerful model / view pattern to display custom data in various views – QListView, QTableView, etc. The problem is that the documentation for model/view programming is massive and it’s difficult to find simple examples on how to create custom models, custom views, etc.

So below is a simple example on how to create a custom model for a QListView. The model takes a std::vector of custom objects, and provides all the necessary methods. I’ve only included the minimal code so that you can get something working quickly, but of course the model can be further customized (see QAbstractListModel reference for instance).

EmployeeListModel.h

class EmployeeListModel : public QAbstractListModel {
	
	Q_OBJECT

public:

	explicit EmployeeListModel(const std::vector<Employee*>& employees, QObject* parent = 0);
	int rowCount(const QModelIndex &parent = QModelIndex()) const;
	QVariant data(const QModelIndex &index, int role) const;
	
private:
	
	std::vector<Employee*> employees_;
	
};

EmployeeListModel.cpp

#include "EmployeeListModel.h"

EmployeeListModel::EmployeeListModel(const std::vector<Employee*>& employees, QObject *parent) : QAbstractListModel(parent) {
	employees_ = employees;
}

int EmployeeListModel::rowCount(const QModelIndex& parent) const {
	return employees_.size();
}

QVariant EmployeeListModel::data(const QModelIndex& index, int role) const {
	// Check that the index is valid and within the correct range first:
	if (!index.isValid()) return QVariant();
	if (index.row() >= decks_.size()) return QVariant();
	
	if (role == Qt::DisplayRole) {
		// Only returns something for the roles you support (DisplayRole is a minimum)
		// Here we assume that the "Employee" class has a "lastName" method but of course any string can be returned
		return QVariant(employees_.at(index.row())->lastName());
	} else {
		return QVariant();	
	}
}

Usage:

EmployeeListModel* model = new EmployeeListModel(employees);
ui->employeeListView->setModel(model);

Copyright © Pogopixels Ltd, 2008-2018